I have already earned $35 within month spending few minutes only

Showing posts with label computer. Show all posts

Tuesday, November 24, 2009

Programmatic Updates to the Registry

Programmatic Updates to the Registry
You can update the registry from within your application. This is most useful when saving application information that may change from session to session. For example, you may want your application to save the placement and size of the application window as well as options selected by the user.


MFC provides registry support through member functions of the CWinApp class. For more sophisticated manipulation of the registry, use API calls, as described below.

Registry Support in MFC

To programmatically work with data in the registry, the first step is to call CWinApp::SetRegistryKey. AppWizard will include a call to this function in your CWinApp-derived InitInstance function.

BOOL CMyApp::InitInstance()
{
//...
SetRegistryKey("_T("Local AppWizard-Generated Applications"));
//...
}

SetRegistryKey is used to select the "Company Name" key in the registry. You, as a developer, will change the AppWizard-generated string to the name of your company. If the key is not found when the call is made, one will be created in the registry. Under the company name key, the framework will also generate a subkey using the name of the application as the subkey name. It is under this key where reads and writes to the registry occur for your application. By default, MFC stores application-specific data under HKEY_CURRENT_USER\Software\<CompanyName>\<ApplicationName>\<SectionName>. "SectionName" is a string that you specify when reading or writing a particular key value; it can be used to organize the location of the saved values.

* To create an .ini file that is compatible with 16-bit Windows applications, remove the call to SetRegistryKey. The framework will create the file using the application's name as the .ini file name and will place it in the WIndows directory.

CWinApp provides four functions for reading and writing key values. The following table describes them.

Function Name Description


CWinApp::WriteProfileString Writes a string value to a key in a given section. If the specified section or key does not exist, it is created. A NULL value for the string value will delete the key.


CWinApp::GetProfileString Reads a string value from a key in a given section. A default return value can be specified if the key is not found.


CWinApp::WriteProfileInt Writes an integer value to a key in a given section. If the specified section or key does not exist, it is created. A NULL value for the integer value will delete the key.


CWinApp::GetProfileInt Reads an integer value from a key in a given section. A default return value can be specified if the key is not found.


Use the integer functions for storing and retrieving integer-like values. Use the string functions for all other values. Functions such as CString::Format and sscanf can be used to do the conversion between the string and desired data type.

To see sample code that shows how to read from and write to the registry programmatically, click this icon.


// Class definition file
class CPhraseApp : public CWinApp
{
...
CString m_defaultPhrase;
CPoint m_defaultLocation;
COLORREF m_defaultColor;
...
}
// Class implementation file
// Phrase Initialization
BOOL CPhraseApp::InitInstance()
{
...
// Force all subsequent calls to "Profile" functions
// to read and write from the registry under the key
// HKEY_CURRENT_USER\Software\MasteringVisualC++\Phrase
SetRegistryKey("MasteringVisualC++");
// Call "Profile" functions for registry information
LoadPhraseDefaults();
...
}

void CPhraseApp::LoadPhraseDefaults()
{// Load information from the registry
CString msg;
msg.LoadString(IDS_WELCOME_MSG);
int r, g, b;
m_defaultPhrase =
GetProfileString ("Settings", "DefaultPhrase", msg);
m_defaultLocation.x =
GetProfileInt ("Settings", "X-location", 100);
m_defaultLocation.y =
GetProfileInt ("Settings", "Y-location", 100);
r = GetProfileInt ("Settings", "Red-intensity", 0);
g = GetProfileInt ("Settings", "Green-intensity", 0);
b = GetProfileInt ("Settings", "Blue-intensity", 0);
m_defaultColor = RGB(r,g,b);
}
int CPhraseApp::ExitInstance()
{// Save information to the registry
WriteProfileString ("Settings", "DefaultPhrase", m_defaultPhrase);
WriteProfileInt ("Settings", "X-location", m_defaultLocation.x);
WriteProfileInt ("Settings", "Y-location", m_defaultLocation.y);
WriteProfileInt ("Settings", "Red-intensity", GetRValue(m_defaultColor));
WriteProfileInt ("Settings", "Green-intensity", GetGValue(m_defaultColor));
WriteProfileInt ("Settings", "Blue-intensity", GetBValue(m_defaultColor));
return CWinApp::ExitInstance();
}

Registry Support in the Win32 API

For information about registry support in the API, search for "RegCreateKeyEx," "RegDeleteKey," "RegEnumKey," "RegOpenKeyEx," and "RegQueryInfoKey" in Visual C++ Help.

Self-Check Questions

1. Which one of the following statements is true about the registry?
A. Like .ini files, the registry is a text-based storage for configuration information.
B. Text-based registry entry files that usually have the extension .reg can be used to update the registry.
C. There are four primary branches, called "keys," in the registry.
D. The registry editors supplied with Windows NT or Windows 95 make backup copies of changes and only commit these changes when you exit the editor.

2. Which one of the following statements is true about MFC's programmatic support of the registry?
A. You must override CWinApp::SetRegistryKey to cause the application settings to be stored in the registry instead of an .ini file.
B. MFC's registry functions can be used to manage any key in the registry.
C. Registry functions are typically used in the overridden CWinApp::InitInstance and CWinApp::ExitInstance functions.
D. Binary data is typically written to the registry by using CWinApp::WriteProfileString.
3. Which one of the following statements about MFC serialization is true?
A. Both SDI and MDI applications can use CDocument::OnNewDocument for per-document initialization, and CDocument::DeleteContents for per-document cleanup.
B. The information to be serialized can be located in any of the framework classes.
C. MFC serialization supports incremental transfers and random access to information.
D. CDocument::SetModified must be called before serialization writes can occur.

4. Which of the following types is supported by MFC's serialization operators, the archive insertion (<<), and extraction (>>) operators?
A. int
B. CObject
C. CObList
D. DWORD
5. Which of the following conditions or steps is not required to add support for serialization to a class?
A. The class must be publicly derived from CObject or a class derived from CObject.
B. The class declaration must declare both an overridden version of CObject::Serialize and invocation of the
DECLARE_SERIAL macro.
C. The class implementation file must contain the implementation for Serialize and an invocation of the IMPLEMENT_SERIAL macro.
D. Each class in an application must have different, sequentially numbered schema.

Lab 11.1: Persisting Data

In this lab, you will write the code to serialize document and state data for an application.

Estimated time to complete this lab: 40 minutes
To complete the exercises in this lab, you must have the required software. For detailed information about the labs and setup for the labs, see Labs in this course.

Objectives

After completing this lab, you will be able to:

® Transfer data between a document's collection and a data file.
® Save and retrieve application state data in the registry.

Prerequisites

There are no prerequisites for this lab.

Exercises

The following exercises provide practice with the concepts and techniques covered in this chapter:

® Exercise 1: Implementing Serialization

In this exercise, you will implement serialization for an application's document, which consists of a single collection of polygon and text items. Here you will implement transferring data between the document's collection and a data file.

® Exercise 2: Saving State Data to the Registry

In this exercise, you will serialize application-state information. You will load the most recently used data file and the view on it, and you will recall the view options on that data file. In addition, you will add code to set your company's registry key in the user's registry.

Exercise 1: Implementing Serialization

The code that forms the basis for this exercise is in \Labs\Ch11\Lab01\Baseline. Copy these files to your working directory.

In this exercise, you will implement serialization for an application's document, which consists of a single collection of polygon and text items. Here you will implement transferring data between the document's collection and a data file.

Edit the Serialize function in CPolyEditDoc

— Replace the if/else code with a direct call to the collection's serialization function. This function will, in turn, call each of the collection members’ serialization functions.

// Serialize the items in the list.
m_items.Serialize(ar);

Edit the Serialize function in CItem

— Within the inner brackets, add code to check the direction flag and then either to store or load the variable.

CItem, the base class for polygons and text objects, maintains a position member variable for the object.

if (ar.IsStoring())
{
ar << m_pos;
}
else
{
ar >> m_pos;
}

Edit the Serialize function in CPolygon
— Within the inner brackets, add code to serialize the polygon's brush, border, and position data.

CPolygon is the class that represents polygons in the document. Each polygon object maintains its brush and border properties as well as an array of data points.

if (ar.IsStoring())
{
// Serialize brush properties
ar << m_styleBrush;
ar << m_colorBrush;
ar << m_hatchBrush;
// Serialize border properties
ar << m_colorLine;
ar << m_styleLine;
ar << m_thickLine;

// Serialize the position data

int count= GetSize();
ar << count;
for (int idx=0; idx<count; idx++)
ar << m_pts[idx];
}
else
{
// Serialize brush properties
ar >> m_styleBrush;
ar >> m_colorBrush;
ar >> m_hatchBrush;

// Serialize border properties

ar >> m_colorLine;
ar >> m_styleLine;
ar >> m_thickLine;

// Serialize the position data

int count;
ar >> count;
for (int idx=0; idx<count; idx++)
{
CPoint pt;
ar >> pt;
m_pts.Add(pt);
}
}

Edit the Serialize function in CText

— Within the inner brackets, add code to serialize the text object's string, color, and font data.

CText is the class for representing text in the document. Each object contains a CString, a color, and a LOGFONT structure containing font information. Remember that the base class, CItem, maintains the positional information.

if (ar.IsStoring())
{
ar << m_string;
ar << m_color;
ar.Write(&m_lf, sizeof(m_lf));
}
else
{
ar >> m_string;
ar >> m_color;
ar.Read(&m_lf, sizeof(m_lf));
}

Edit NewPolygon in CPolyEditDoc
1. Before the call to UpdateAllViews, insert the following code. SetModifiedFlag informs the framework that document data has changed. This will serve to prompt the user to have the file saved before quitting. Search for other occurrences of this call in the project.
SetModifiedFlag();
2. Build and run the application.
3. Test this version of the application by creating a new document and adding several polygons and text objects. Save the document and then clear the current view by opening up a new document. Using the FileOpen menu, open the document you just saved.
You can find the code for this completed exercise in \Labs\Ch11\Lab01\Ex01.

Exercise 2: Saving State Data to the Registry

Continue working with the files you created in Exercise 1, or you can find the code that forms the basis for this exercise in \Labs\Ch11\Lab01\Ex01.

In this exercise, you will serialize application-state information. In particular, you will load the most recently used data file and the view on it, and you will recall the view options on that data file. In addition, you will add code to set your company's registry key in the user's registry.

Edit InitInstance in CPolyEditApp

1. Search for the call to SetRegistryKey. Replace the existing call with the following:
SetRegistryKey(_T("Microsoft Mastering Series"));
2. In the same function and between the calls to ParseCommandLine and ProcessShellCommand, add the following code. This code will inform the framework that the most recently used file is to be loaded at startup of the application.
// check that the user did not specify filename on command line.
if (cmdInfo.m_strFileName == "")
{
CString lastFileUsed= GetProfileString("Recent File List", "File1",NULL);
if (lastFileUsed != "")
{
cmdInfo.m_strFileName = lastFileUsed;
cmdInfo.m_nShellCommand = CCommandLineInfo::FileOpen;
}
}


Edit CPolyEditView
1. Add the following code to the destructor to save the application view state and option selections upon quitting.
// View scale
CString strScale;
strScale.Format("%lg",m_scale);
AfxGetApp()->WriteProfileString("Settings", "Scale", strScale);

// View center

AfxGetApp()->WriteProfileInt("Settings", "CenterX", m_x);
AfxGetApp()->WriteProfileInt("Settings", "CenterY", m_y);

// View options

AfxGetApp()->WriteProfileInt("Settings", "ShowInnerBox", m_bShowInnerBox);
AfxGetApp()->WriteProfileInt("Settings", "ShowOrigin", m_bShowOrigin);

2. Edit the CPolyEditView constructor. Replace the code that initializes the view and options with the following code. This code will obtain the settings that were stored in the registry to initialize the view.

// View scale
CString strScale = AfxGetApp()->GetProfileString("Settings", "Scale", "1.0");
sscanf(strScale,"%lg", &m_scale);

// View center

m_x = AfxGetApp()->GetProfileInt("Settings", "CenterX", 0);
m_y = AfxGetApp()->GetProfileInt("Settings", "CenterY", 0);

// View options

int option;
option = AfxGetApp()->GetProfileInt("Settings", "ShowInnerBox", 1);
m_bShowInnerBox = option ? true : false;
option = AfxGetApp()->GetProfileInt("Settings", "ShowOrigin", 1);
m_bShowOrigin = option ? true : false;
3. Build and run the application.
4. Test it by creating a document and adjusting the zoom level and center values. Quit the application and then restart it. The view should contain the same document and view parameters.

You can find the code for this completed exercise in \Labs\Ch11\Lab01\Ex02.

Schema Numbering

Schema Numbering

Over time, and given changes in versions, a program often changes the data set contained within its document class. This could become a source of serious errors, because a file saved with a previous version of a program could be erroneously loaded into a newer version. For example, suppose a document contains a pointer to an object of class CSerializedPhrase, version 1. If the class CSerializedPhrase is then updated to version 2 to include additional data members, the application must keep the document from inadvertently using the new version, or errors will result.

To guard against version changes that cause errors, your application can use and check a schema number, which represents the version of the dataset composition or format of your serializable class. When you change the data members in the serializable class, you should also change the schema number of that class. In order to take advantage of schema numbering, there are issues to be handled in both the serializable class and in the document class.

Using a Schema Number in the Serializable Class

To use schema numbering in a serializable class, you need to add code. To see sample code that shows how to add serialization with schema numbering to the serializable class, click this icon.
// Serializ.cpp : implementation file
// Defines version as 1 and "versionable"
IMPLEMENT_SERIAL(CSerializedPhrase, CObject, VERSIONABLE_SCHEMA | 1)
CSerializedPhrase::CSerializedPhrase()
{
}
void CSerializedPhrase::Serialize(CArchive & ar)
{
int nVersion;
// The base function is called first.
CObject::Serialize(ar);
if (ar.IsLoading())
{
nVersion = ar.GetObjectSchema();
switch (nVersion)
{
case -1:
::AfxMessageBox("Unknown Version");
break;
case 1:
::AfxMessageBox("Version 1");
ar >> m_phrase >> m_location >> m_color;
break;
default:
::AfxMessageBox("Future version");
}
}
else
// Files are always saved in the current version.
ar << m_phrase << m_location << m_color;
}

Using a Schema Number in the Document Class

In addition to adding the necessary code to a serializable class to use schema numbering, there are conditions in the document that must be met in order to get the correct schema number.

If the document calls Serialize directly, the call to CArchive::GetObjectSchema in the serializable class's Serialize function will always return – 1, indicating an unknown version number. To see sample code that illustrates this problem, click this icon.
// An Example of Problems with Schema Numbering
class CPhraseDoc : public CDocument
{
...
CSerializedPhrase m_Phrase;
// or
CSerializedPhrase * m_pPhrase;
...
};
CPhraseDoc:: CPhraseDoc()
{
m_pPhrase = new CSerializedPhrase;
}
void CPhraseDoc::Serialize(CArchive & ar)
{
//Warning: In both cases below, a -1 is returned
// in the serializable class instead of
// the object's schema number
m_Phrase.Serialize(ar);
// or
m_pPhrase ->Serialize(ar);
}
Taking Advantage of Schema Numbering
To guard against serious errors, use the following steps to have your application use and check a schema number.

To get schema numbering to work correctly

1. Define a pointer to the serializable class in the document's definition file.

2. Initialize that pointer to 0 in the document's constructor.

3. Use the archive class's overloaded << and >> operators for serialization on that pointer.

To see sample code that shows the method of doing serialization in the document so that schema numbering will work correctly, click this icon.
// PhrasDoc.cpp : implementation file
CPhraseDoc :: CPhraseDoc()
:m_pPhrase(0)
{
// ...
}
void CPhraseDoc::Serialize(CArchive & ar)
{
if (ar.IsLoading())
ar >> m_pPhrase;
else
ar << m_pPhrase;
}
BOOL CPhraseDoc::OnNewDocument()
{
if (!CDocument::OnNewDocument())
return FALSE;
m_pPhrase = new CSerializedPhrase;
// fill object as appropriate
return TRUE;
}
void CPhraseDoc::DeleteContents()
{
delete m_pPhrase;
m_pPhrase = 0;
CDocument::DeleteContents();
}


For more information about persistence and schema numbering, search for "TN002: Persistent Object Data Format" in Visual C++ Help.

The Registry
One purpose of the registry is to store information that will be used by an application from one session to the next. Most recently used files, application-specific folders, and user-selected options are commonly stored in the registry.

In past versions, Windows stored application information in .ini files. This storage method posed a number of problems, however, because the settings for each application were stored in a separate file that could be easily deleted, moved, or modified by the user. The registry makes the storage of configuration information for all applications more manageable by placing it in a single location: the registry database.

Another difference between the registry and .ini files is how the data is stored. While .ini files are written to as text — either by an application or by someone using a text editor — the registry is binary. Its contents are accessible through a tool, RegEdit, or accessible programmatically by means of CWinApp methods.

This section explains the registry in more detail. First, it discusses the organization of the registry database. Then it explains how to view and edit the information contained in the registry using the registry editor. Finally, it shows you two techniques for manipulating the registry from within your application: through registry entry files and programmatic access to the registry through CWinApp methods.

This section includes the following topics:

Registration Database Structure

The registration database (another name for the registry) is a hierarchical database of configuration information. At the root of the hierarchy are six predefined primary keys, or branches, that provide entry points into the registry. The primary keys contain keys, which can contain other keys. Keys can also contain values. A value associates a keyword parameter with a configuration value, which is similar to the entries in an .ini file, except that the data itself is binary. To see an illustration that contains sample keys and their values, click this icon.


Predefined Primary Keys

The following table lists the six primary keys that provide entry points into the registry, and their purpose.

Key name Purpose

HKEY_CLASSES_ROOT Contains software configuration information, particularly for use with COM objects. Includes file extensions /application associations, drag-and-drop protocols, printing configurations, and what to do when a file name receives a double-click.HKEY_CURRENT_USER Contains user-specific settings for the system and applications. Created when the user logs on, and is loaded to this key from that user's entry in HKEY_USERS. MFC applications store registry information under this primary key.HKEY_LOCAL_MACHINE Contains specifications for the computer and drivers and other system settings for the type of hardware installed. Entries in this section are shared by all users of the system.HKEY_USERS Contains information about all the users who log on to the computer. Includes both user-specific information and generic user information. Generic system settings are available to all users of the system.HKEY_CURRENT_CONFIG Contains information about the current configuration of the hardware that is attached to a dockable computer that supports multiple configurations.HKEY_DYN_DATA Contains the dynamic status information for various devices. This information is used in the implementation of Plug and Play technology.The Registry Editor

The registry editor provides a graphical interface to view and edit the key hierarchy and values within the registration database.

Viewing the Registry

To view the registry, run RegEdit. The left pane of RegEdit contains a tree view of the database with the primary keys at the root of the view. Key values that contain other keys can be expanded and collapsed in this view. The right view contains keys and their values at the currently selected key in the Tree View pane. Keys can be modified, renamed, or deleted by right-clicking on the key name in the right pane.

To see an illustration that shows how RegEdit displays information about application-specific keys in the registry, click this icon.


Modifying the Registry Safely

You should take care when changing registry settings. Any changes that you make to the registration database take effect immediately. There is no separate Save command in the registry editor.

If there is an error in your registry, your computer may become nonfunctional. If this happens in Windows 95, you can restore the registry to its previous state when you last successfully started your computer.

The following procedure is from the Windows 95 Registry Editor online Help.

To restore the registry in the Windows 95 operating system

1. Click Start, and then click Shut Down.
2. Click Restart the computer in MS-DOS mode, and then click Yes.
3. Switch to your Windows directory. For example, if your Windows directory is C:\Windows, you would type the following:

cd c:\windows

4. Type the following commands, pressing ENTER after each one. (Note that System.da0 and User.da0 contain the number zero.)
attrib -h -r -s system.dat
attrib -h -r -s system.da0
copy system.da0 system.dat
attrib -h -r -s user.dat
attrib -h -r -s user.da0
copy user.da0 user.dat
5. Restart your computer.

Registry Entry Files

A registry entry file is a text file that contains data for the registration database. When the registry editor processes a registry entry file, it uses the information contained there to add and update values within the registration database. Registry entry files cannot be used to remove information from the database.

Registry Entry File Structure

Structurally, registry entry files are simple. The typical file extension is .reg. The first line contains the single word REGEDIT to mark the file as a registry entry file. Comments are marked by an initial semicolon and continue to the end of the line. Individual entries appear one per line in the following format:

branch\key name = value

For example, a registry entry file might appear as follows:
REGEDIT ; This .REG file may be used by your SETUP program.
HKEY_CLASSES_ROOT\.PHR = Phrase.Document


Registry Entry File Use

Setup programs use registry entry files to register their data files for shell activation. A setup program calls the registry editor and passes the registry entry file name to it as a command-line argument. The file is verified by ensuring that the first line of the file contains REGEDIT, and then the individual entries are parsed and added to the database.

Creating a Registry Entry File with AppWizard

You can use AppWizard to create a registry entry file for your application. To see an illustration of the Advanced Options dialog box in Step 4 of AppWizard, which is used to set a default file extension for documents associated with your application, click this icon.


To see a sample registry entry file, click this icon.


; phrase.reg

REGEDIT; This .REG file may be used by your SETUP program.
; If a SETUP program is not available, the entries below will be
; registered in your InitInstance automatically with a call to
; CWinApp::RegisterShellFileTypes and COleObjectFactory::UpdateRegistryAll.

HKEY_CLASSES_ROOT\.PHR = Phrase.Document
HKEY_CLASSES_ROOT\Phrase.Document\shell\open\command = PHRASE.EXE %1
HKEY_CLASSES_ROOT\Phrase.Document\shell\open\ddeexec = [open("%1")]
HKEY_CLASSES_ROOT\Phrase.Document\shell\open\ddeexec\application = PHRASE
; note: the application is optional
; (it defaults to the app name in "command")
HKEY_CLASSES_ROOT\Phrase.Document = Phrase Document

Serializing Data Structures

Serializing Data Structures

Arbitrary data structures can be serialized by using the member functions CArchive::Write and CArchive::Read. Each of these functions takes as parameters a pointer to a buffer and the number of bytes to transfer. The following code example uses these functions to serialize a LOGFONT data structure:

void CMyFont::Serialize(CArchive& ar)
{
LOGFONT logfont;
if (ar.IsStoring())
{
// call user function to initialize the structure.
InitLogFont(&logfont);
ar.Write(&logfont, sizeof(logfont));
}
else
{
ar.Read(&logfont, sizeof(logfont));
// call user function to save the structure.
SaveLogFont(&logfont);
}
}

Serializing Class Objects
Class objects can be serialized if they have been derived from CObject and have overridden the Serialize member function. For example, many of the MFC collection classes override this function for you. To serialize a document that contains such an object, call the Serialize function of the member directly.


Making a Serializable Class
You can implement object persistence for any class by adding serialization support for that class. You add this support by first declaring the class as serializable and then implementing the necessary serialization code.


To make a serializable class

1. Publicly derive the class from CObject or from a class that was derived from CObject.
2. In the class declaration, provide a default constructor. The framework requires a default constructor (a constructor with no arguments) to create objects when loading data from a data file. If you use ClassWizard to add a new class, it will automatically add a default constructor.
3. In the class declaration, add the DECLARE_SERIAL macro. Provide the class name as the single argument.
4. In the implementation file, add the IMPLEMENT_SERIAL macro. The three parameters to IMPLEMENT_SERIAL are the class being serialized, its base class, and a schema number.
5. Override the CObject::Serialize function. This is easily done by right-clicking the class name in ClassView and then selecting the menu item Add Virtual Function.


To see sample code that declares a serializable class, click this icon.

// Serializ.h - header file

// Publicly derive the class from CObject
class CSerializedPhrase : public CObject
{
protected:
// Provide a default constructor
CSerializedPhrase();
public:
// Override Serialize
void Serialize(CArchive &);
// Invoke the DECLARE_SERIAL macro
DECLARE_SERIAL(CSerializedPhrase)
...
};

To see sample code that implements serialization for a class, click this icon.

// Serializ.cpp - implementation file
IMPLEMENT_SERIAL(CSerializedPhrase, CObject, 1)
CSerializedPhrase::CSerializedPhrase()
{

}
void CSerializedPhrase::Serialize(CArchive & ar)
{
// The base function is called first.
CObject::Serialize(ar);
if (ar.IsLoading())
ar >> m_phrase >> m_location >> m_color;
else
ar << m_phrase << m_location << m_color;
}

Using a Serializable Class
How you use a serializable class depends upon whether you are working with an object of the serializable class or a pointer to an object of the serializable class. This topic also covers how to handle issues of schema numbering both in the serializable class and in the document class.

Serializing Objects
If your document class uses your serializable class as an embedded member, you can invoke the Serialize method directly, as shown in the following example code:

class CPhraseDoc : public CDocument
{
...
// Define a CSerializedPhrase object
CSerializedPhrase m_Phrase;
...
}
// CPhraseDoc.cpp implementation file
void CPhraseDoc::Serialize(CArchive& ar)
{
m_Phrase.Serialize(ar);
}

Serializing Objects via Pointers

Using a pointer for the serializable object has its own set of considerations. How you handle the serialization depends upon whether or not the pointer was initialized.

Deserializing to Uninitialized Object Pointers

If the class contains an uninitialized object pointer, then you should rely on the extraction and insertion operators (>> and <<) for serialization of the object. In the case of reading from the data file, the archive object will build the object using its default constructor and then call the object's Serialize function. As an alternative, you can explicitly construct the object pointer and then call the Serialize function. To see sample code that uses the archive to handle memory allocation when you deserialize an object, click this icon.

// PhrasDoc.h
class CPhraseDoc : public CDocument
{
...
// Define a CSerializedPhrase pointer
CSerializedPhrase * m_pPhrase;
...
}
// PhrasDoc.cpp
CPhraseDoc :: CPhraseDoc()
:m_pPhrase(0)
{

}
void CPhraseDoc::Serialize(CArchive& ar)
{
if (ar.IsLoading())
ar >> m_pPhrase;
else
ar << m_pPhrase;
}
BOOL CPhraseDoc::OnNewDocument()
{
if (!CDocument::OnNewDocument())
return FALSE;
m_pPhrase = new CSerializedPhrase;
// fill object as appropriate
return TRUE;
}
void CPhraseDoc::DeleteContents()
{
delete m_pPhrase;
m_pPhrase = 0;
CDocument::DeleteContents();
}

Deserializing to Initialized Object Pointers

If the object pointer is already initialized, then you can use either the extraction and insertion operators (>> and <<), or you can call the object's Serialize function directly. What is important is that you make sure that the object cleans up its data members before deserializing from the data file. Not adhering to this rule will generate memory leaks in your application. Cleaning up an object's data members is often done by calling a user-defined member function that frees memory allocated from the heap.

The document object provides a convenient place for deleting its contents in the CDocument::DeleteContents member function. The MFC framework is structured so that it will call this function when a document is to be reused or destroyed. A useful strategy is to create a DeleteContents member function for each serialized class that you create and then have each object call the DeleteContents function of each of its contained objects. Since the framework calls the document's DeleteContents member function, the entire document will be efficiently and correctly deleted.


Whichever method you decide to use, you must be consistent. Use the same method — either the Serialize function or the CArchive << and >> operators — for both the loading and storing of any one object.

Opening a New File

Opening a New File

When a user chooses the New command on the File menu in an AppWizard-generated application, the default framework behavior is as follows.

1. Checks whether the current document has been modified and, if so, prompts the user to save it. Saves the current document if the user says yes.
2. Removes the contents of the old document.
3. Creates a new document.


Virtual Functions to Manage Document Creation

The CDocument class provides two virtual functions that can be overridden to provide for handling the document-creation process.
CDocument::OnNewDocument is called by the framework as part of the New command. The default implementation of this function calls DeleteContents to empty the document, and then marks the document as clean.

You can override this function to do per-document initialization instead of placing this code in the constructor for your document class.

CDocument::DeleteContents empties the document without destroying the document object itself. The default implementation of this function does nothing. Commonly, this function is overridden to delete dynamically allocated objects in your document, rather than using the destructor.

MDI vs. SDI

Because SDI applications use only a single document object, CDocument::DeleteContents is used to reuse the single document object whenever the user creates another document. No constructor or destructor for the associated document object is called on subsequent New operations.

In an MDI application, opening a new file causes a new document object to be created with its attendant views. The function CDocument::OnNewDocument is called for the document after it is constructed.

Opening an Existing File

When a user chooses the Open command on the File menu in an AppWizard-generated application, the default behavior is as follows:

1. Checks whether the current document has been modified and, if so, prompts the user to save it. Saves the current document if the user says yes.

2. Displays the Open common dialog box and accept the user's file selection.

3. Removes the contents of the old document.

4. Loads the new document by deserializing its data.


Internally, the process is much more complicated, but most of the details are encapsulated into the application framework. In fact, in most cases, you need concern yourself only with specifying which data to serialize and in what order. The application framework manages the opening and closing of files, and the instantiation of the document and view objects.

Virtual Functions for Special FileOpen Situations

The CDocument class provides two virtual functions that can be overridden to provide for the handling of special FileOpen operations:

® CDocument::OnOpenDocument provides a place to do per-document initialization when an existing file is opened. The framework calls OnOpenDocument as part of the file-opening process. The default implementation of this function opens the specified file, calls DeleteContents to empty the document, calls Serialize to read the file contents, and then marks the document as clean.

It is more rare to override OnOpenDocument than it is to override OnNewDocument, since serialization is usually sufficient to initialize the document when opening an existing file.

® CDocument::DeleteContents empties the document without destroying the document object itself. The default implementation of this function does nothing.


SDI vs. MDI

Because SDI applications use only a single document object for the duration of the application, CDocument::DeleteContents is used to reuse the single document object whenever the user opens another document. No constructor or destructor for the associated document object is called during FileOpen operations.

In an MDI application, opening an existing file causes a new document object and its attendant views to be created. The CDocument::OnNewDocument function is called for the document after it is constructed.

Saving or Closing a File

Saving a file involves having the document store its data and objects by calling its Serialize function.

Before closing a document, the framework calls CDocument::IsModified to determine if the document data has changed. If data has changed, the framework displays a dialog box to ask the user whether or not the modified data should be saved.

Marking a Document as Modified

It is the developer's responsibility to ensure that the modified flag is set when the document data has changed. In general, the program should call CDocument::SetModifiedFlag whenever a document's data has changed. This guarantees that no changed document will be closed without first asking the user if the data should be saved.

MDI vs. SDI

In an MDI application, when a document is closed, CDocument::DeleteContents is called before the destructor for the associated document object.

Because an SDI application must have exactly one document open at a time, the Close command is not usually available on the File menu.

Serializing a Document Class

If you generate a nondatabase application, AppWizard overrides CDocument::Serialize for your application's document class. However, AppWizard supplies only an almost empty implementation for this member function. It is your responsibility to add the proper implementation code to the Serialize function based upon the details of your application's document class. The following example code shows a typical Serialize function that is generated by AppWizard:

void CMyDoc::Serialize(CArchive& ar)
{
if (ar.IsStoring())
{
// TODO: add storing code here
}
else
{
// TODO: add loading code here
}
}


Serialization Helper Functions

MFC serialization is responsible for both storing and loading data. To allow the Serialize function to handle both cases, two adjunct functions exist: CArchive::IsLoading returns TRUE if reading from the file; CArchive::IsStoring returns TRUE if writing to the file.


Note The order in which members are loaded and stored must match exactly, or the data in the document will be corrupted. Neither the Visual C++ compiler nor the application framework can check this for you.


Serializing Built-in Data Types

Similar to the standard Visual C++ iostream class library, CArchive provides overloaded insertion (<<) and extraction (>>) operators for data insertion and extraction in the following portable Visual C++ and Microsoft Windows simple built-in data types.

CTime and CTimeSpan SIZE and CSize float

WORD CString POINT and CPoint

DWORD BYTE RECT and CRect

double LONG COLORREF

BOOL


Nonportable data types, such as int, do not have corresponding overloaded CArchive serialization operators. If the document class contains members of these nonportable data types, the developer can cast them to their equivalent portable types for serialization.

To see sample code that serializes document class members that are built-in data types, click this icon.

// Class definition

class CSerialDocumentDoc : public CDocument
{
...
CString m_phrase;
CPoint m_location;
COLORREF m_color;
...
};
// Class definition
void CSerialDocumentDoc::Serialize(CArchive& ar)
{//
if (ar.IsStoring())
ar << m_phrase << m_location << m_color;
else
ar >> m_phrase >> m_location >> m_color;
}

Implementing Persistence

Implementing Persistence
Application persistence is the act of saving information about the application between program sessions. MFC provides support for two forms of persistence: serialization and application-state persistence.

Serialization is a mechanism for preserving application data and consists of streaming data out to a data file. MFC provides much of the structure for implementing serialization through its application framework. The developer completes the serialization structure by implementing application-specific code to serialize the data that is to be preserved.

Application-state persistence saves information about the user's session. The state information that is saved depends upon the application and can include such information as the application window's size and position on the desktop and any operating modes that the user last selected, as well as an application's option settings. While serialization saves data to a data file, state persistence uses the operating system's registry to store its data.

This chapter discusses both forms of persistence: implementing document serialization through the use of data files, and preserving application state information through the use of the operating system's registry.

Objectives

After completing this chapter, you will be able to:

® Define serialization and how it is integrated in MFC.
® Describe how MFC supports persistent storage.
® Create a serializable class.
® Create and use serializable objects.
® Describe the registry.
® View and modify the registry.
® Programmatically update the registry.

Serialization
Serialization is the process of storing data from the application to a data file or loading data from a data file to the application. Serialization is integrated within the MFC's document/view architecture and can occur as a result of the user's explicitly saving or loading a data file. Serialization can also occur as a side effect of modifying the document data. In this case, the MFC application framework will prompt the user to save the data before deleting the data from the document.

The approach to serialization within MFC is that the document object begins the serialization of data. The document object either serializes data directly, or it delegates the task of serialization to the data objects contained within the document. The objects, in turn, implement the functionality to save their data members. Later, these objects can restore their data members by reading, or "deserializing," the data from persistent storage. A key point is that the objects themselves are responsible for reading and writing their own state. For a class to be persistent, it must implement the basic serialization operations.

In the document/view architecture the serialization process starts at the developer's CDocument-derived class where AppWizard has generated a Serialize function. From the Serialize function, the developer creates application-specific code that transfers the data. The framework passes in a reference to an archive object when the Serialize function is called. The archive object acts as an intermediate object between the document and the data file. The document's Serialize function uses the archive object directly or, for more complicated document objects, the document will pass the archive object to the document's data objects, which will then serialize themselves.

To see an illustration of the serialization process, click this icon.


Serialization in MFC depends upon a number of classes in your application's framework. The following table lists the primary classes and their purpose.

Class Purpose


CObject Serves as a base class for objects that are to be serialized. The member function CObject::Serialize is overridden by the developer to implement serialization for the data object.


CDocument Contains the information (data and objects) to be serialized. The member function CDocument::Serialize specifies what portion of this information is to be serialized.


CArchive Provides a context for serialization. CArchive handles process-dependent factors, such as media access and buffering. During construction, a CFile object is "attached" to the archive. A single CArchive object can be used for either storing or loading data, but not for both.


CFile Represents the file on a storage device, such as a hard disk. CFile directly provides unbuffered, binary disk input/output services, and it indirectly supports text files and memory files through its derived classes.


This section explains the default behavior for serialization that is provided by the framework. It also reviews the process of declaring, implementing, and using a new user-defined serializable class.

This section includes the following topics:

Serialization Support Implemented by MFC
The FileNew, FileOpen, and FileSave commands are three common ways to explicitly initiate serialization. This topic describes the MFC classes and functions available to help you implement your serialization code, including the differences between SDI and MDI applications during the serialization operation.

Serialization and MFC

Important points to remember about serialization support as implemented by MFC are:

® Actual data serialization begins with the CDocument::Serialize function.
® All objects are transferred in totality — that is, partial serialization is not allowed.
® Objects are loaded in the same order that they were saved.
® Synchronize documents by using a schema number.

Monday, November 23, 2009

Creating Class and Function Templates

Lab 10.1: Creating Class and Function Templates

In this lab, you will use class and function templates to manage the data in a document file.

Estimated time to complete this lab: 90 minutes

To complete the exercises in this lab, you must have the required software. For detailed information about the labs and setup for the labs, see Labs in this course.

Objectives

After completing this lab, you will be able to:

® Create class and function templates.

® Use CMap and CArray collection templates.


Prerequisites

Before working on this lab, you should be familiar with the following:

® CMap, CArray, and CList collection classes


Exercises

The following exercises provide practice with concepts and techniques covered in this chapter:

® Exercise 1: Creating a Class Template

In this exercise, you will create a header file for a class template.

® Exercise 2: Adding Collection Templates That Use CMap and CArray

In this exercise, you will use the class templates created in the first exercise to manage data in a document file.

® Exercise 3: Creating a Function Template
In this exercise, you will create a sorting function template.

Exercise 1: Creating a Class Template

The code that forms the basis for this exercise is in \Labs\Ch10\Lab01\Baseline. Copy these files to your working directory.

In this exercise, you will create a new header file named TCount.h and define a template named TCount. You will add one constructor and three member functions, GetContents, GetCount, and IncrementCount.

Start a new project
1. Copy the startup code in the baseline folder to your project folder.
2. Create a new header file in the project and name it TCount.h.
Add code to define the TCount template class
1. Add the statements that check to see whether the header file for TCount has been defined.
// TCount.h
#ifndef TCOUNT_H
#define TCOUNT_H
2. Define the TCount class template.
template <class T>
class TCount
{
3. Declare an integer member variable named m_count and a template variable, type T, named m_type.
int m_count;
T m_type;
4. Create a public section in the class. Define a constructor that takes template type T as a parameter. Initialize the m_type member variable to this parameter, and initialize the count to zero.
public:
TCount( T type) { m_type= type; m_count = 0;}
5. Define a public member function named GetCount that returns the integer variable m_count.
int GetCount() { return m_count; }
6. Define a public member function named GetContents that returns a reference to type T.
T& GetContents() { return m_type; }
7. Define a public member function named IncrementCount that increments the variable m_count.
int IncrementCount() { return ++m_count; }
8. Terminate the template definition and add the closing #endif statement.
};
#endif
9. Save TCount.h. The completed template class definition should look like the following example code:
// TCount.h
#ifndef TCOUNT_H
#define TCOUNT_H

template <class T>

class TCount
{
int m_count;
T m_type;
public:
TCount( T type) { m_type= type; m_count = 0;}

int GetCount() { return m_count; }

T& GetContents() { return m_type; }
int IncrementCount() { return ++m_count; }
};

#endif

The completed code for this exercise is in \Labs\Ch10\Lab01\Ex01.

Exercise 2: Adding Collection Templates That Use CMap and CArray

Continue with the files you created in Exercise 1, or if you do not have a starting point for this exercise, the code that forms the basis for this exercise is in \Labs\Ch10\Lab01\Ex01.

In this exercise, you will write the code that opens a document file, adds its contents to an array template, and prints the output to the screen.

Add a reference to the TCount class template file and CMap and CArray
1. Include header files at the top of CWrdDoc.h, just before the CWrdDoc class definition.
#include <afxtempl.h> // for the template collection classes
#include "tcount.h"
2. Add CWrdDoc::m_map and CWrdDoc::m_array. Add these manually to the CWrdDoc header file, as protected members.
CMap< CString, LPCSTR, TCount<CString>*, TCount<CString>* > m_map;
CArray< TCount<CString>*, TCount<CString>* > m_array;

Create a virtual function named DeleteContents that will delete any existing contents from CMap and CArray

This function uses the GetCount method of the TCount template as part of the code that locates and deletes any contents in CMap.
1. Right-click CWrdDoc in ClassView, and add DeleteContents as a virtual function.
2. Initialize an integer variable to hold the number of items in the map and set a position variable at the first item in the map.
int count = m_map.GetCount();
POSITION pos = m_map.GetStartPosition();
3. Iterate through the map and delete all the objects from the map.
for (int idx=0; idx<count; idx++) {

CString dummyString;

TCount<CString>* pStringObject;
m_map.GetNextAssoc( pos, dummyString, pStringObject );
delete pStringObject;
}
4. Delete all pointers from the array and the map.
m_map.RemoveAll();
m_array.RemoveAll();
5. The completed function should look like the following example code:
void CWrdDoc::DeleteContents()
{
// Retrieve the object pointers and delete objects
int count = m_map.GetCount();
POSITION pos = m_map.GetStartPosition();
for (int idx=0; idx<count; idx++) {

CString dummyString;

TCount<CString>* pStringObject;
m_map.GetNextAssoc( pos, dummyString, pStringObject );
delete pStringObject;
}

// Remove the pointers from the structures.

m_map.RemoveAll();
m_array.RemoveAll();

// Call the base class.

CDocument::DeleteContents();
}

Add code to handle the contents of CMap and CArray and open a document file
1. Add a call to DeleteContents as the first statement in CWrdDoc::Process.
bool CWrdDoc::Process(CStdioFile & file)
{
// Delete doc contents
DeleteContents();
//…
2. Complete CWrdDoc::Process by adding the following code to the innermost block. This code will take each word from the target file and determine if it exists in the CMap object. If it does not exist, the code will create a new entry in the CMap object for that word.

TCount<CString>* pStringObject;

// Search for the object, create it if not found

if (!m_map.Lookup(strToken,pStringObject))
{
pStringObject = new TCount<CString>(strToken);
// add to map
m_map.SetAt(strToken, pStringObject);
// add to array
m_array.Add(pStringObject);
}
3. After the closing bracket, add code to increment the token count.
pStringObject->IncrementCount();
4. Complete CWrdDoc::OnFileOpen code by adding a call to CWrdDoc::Process. CWrdDoc::Process will take the file selected by the user and extract all of the words from that file. The complete handler is shown in the following example code:
void CWrdDoc::OnFileOpen()
{
CFileDialog dlg(TRUE);
if (dlg.DoModal() == IDOK)
{
CStdioFile file;
CFileException fe;
if (!file.Open(dlg.GetPathName(),CFile::modeRead,&fe))
{
fe.ReportError();
return;
}
SetTitle(file.GetFileName());

// Have document process the file

{
Process(file);
}

file.Close();

POSITION pos = GetFirstViewPosition();
CWrdView* pView = (CWrdView *) GetNextView(pos);
pView->Invalidate();
}
}
5. Modify CWrdDoc::GetSize so that it returns the number of items in CMap.
int CWrdDoc::GetSize()
{
return m_map.GetCount();
}

6. Replace CWrdDoc::draw code so that it uses TCount to display the contents of the CMap.

void CWrdDoc::draw(CDC * pDC, int SortType, int VerticalSpacing, int CharacterWidth)

{
// TODO:
// Add sorting code.

// Iterate through doc writing out array information.

int count = GetSize();
for (int idx=0; idx<count; idx++)
{
// Instantiate a TCount template.
TCount<CString>* pStringObject;

// Access the array

pStringObject = m_array.GetAt(idx);

// The item name:

CString& string = pStringObject->GetContents();
pDC->TextOut(5*CharacterWidth, idx*VerticalSpacing, string);
// The item count:
CString strCount;
strCount.Format("%d", pStringObject->GetCount());
pDC->TextOut(50*CharacterWidth,idx*VerticalSpacing, strCount);
}
}

The completed code for this exercise is in \Labs\Ch10\Lab01\Ex02.

Exercise 3: Creating a Function TemplateContinue with the files you created in Exercise 2, or if you do not have a starting point for this exercise, the code that forms the basis for this exercise is in \Labs\Ch10\Lab01\Ex02.


In this exercise, you will add a function template for sorting the contents of an array. You will also add several sorting functions to the document object file.

Create the TQSort function template

1. Create a new header file, TQSort.h, and add the following code:

#ifndef TQSORT_H
#define TQSORT_H
// add code here.
#endif

2. Within the conditional statement, add a function template to swap two items of an array.

// Swap function template
template <class Type>
static void swap(Type* array, int i, int j)
{
Type temp = array[i];
array[i] = array[j];
array[j] = temp;
}
3. After the swap template, add the following:
// Quicksort template

// 'Type' will be passed to the comparison function.

// The comparison function will then determine how the comparison is done.
template <class Type>
void quicksort(Type* array, int loBound, int hiBound, int (*compfn)(Type,Type))
{
// stopping condition for recursion.
if (loBound >= hiBound)
return;

// the main algorithm.

int lo = loBound;
int hi = hiBound + 1; // increment now for a later pre-decrement.
Type elem = array[loBound];
for (;;)
{
// Compare elements here.
while ((lo<hiBound) && (compfn(array[++lo],elem)<0)) {}
while ((hi>loBound) && (compfn(array[--hi],elem)>0)) {}
if (lo < hi)
swap(array, lo, hi);
else
break;
}
swap(array, loBound, hi);
quicksort(array, loBound, hi-1, compfn);
quicksort(array, hi+1, hiBound, compfn);
}


Add a reference to the TQSort function header file to the document object leader file
® Open the file WrdDoc.cpp. Include the TQSort.h file after the #include "WrdView.h" statement.
#include "TQSort.h"

Create compare functions in the document object header file
1. At the end of the WrdDoc.cpp file, add a compare function to sort by name.
int compareName( TCount<CString>* pStringObject1, TCount<CString>* pStringObject2)
{
CString& str1 = pStringObject1->GetContents();
CString& str2 = pStringObject2->GetContents();

// sort in ascending order

return _stricmp(
str1.GetBuffer(str1.GetLength()) , str2.GetBuffer(str2.GetLength()) );
}
2. Add a compare function to sort by count.
int compareCount( TCount<CString>* pStringObject1, TCount<CString>* pStringObject2)
{
int int1 = pStringObject1->GetCount();
int int2 = pStringObject2->GetCount();

// Sort in descending order

return (int1<int2) ? 1 : (int1==int2) ? 0 : -1;
}
3. Add DoSort as a public member function of CWrdDoc class.
void DoSort(int SortType);

4. Complete the DoSort function to sort the array.

void CWrdDoc::DoSort (int SortType)
{
if (SortType == SORT_BY_NOTHING)
return;
// Creating a pointer for the compare function, basing it upon sort type.
int (*comp)(TCount<CString>*, TCount<CString>* ) =
SortType==SORT_BY_COUNT ? compareCount :
compareName;
// sort the array.
quicksort(m_array.GetData(), 0, m_array.GetUpperBound(), comp);
}
5. Add a call to DoSort as the first call in CWrdDoc::Draw.
DoSort(SortType);
6. Build and run the application.
The completed code for this exercise is in \Labs\Ch10\Lab01\Ex03.

Creating Class Templates

Creating Class Templates

Class templates are useful for creating abstract data types, which can then be used to create classes based on specific data types. For example, you can use a linked list template to parameterize the data that is held at each of the link list's nodes.

You can use class templates to create collection templates, create new data types, and modify existing data types.

This section includes the following topics:

Class Template Syntax

Class templates are composed of three elements:

® The template keyword
® A comma-delimited list of formal parameters, enclosed in angle brackets (<>)
® The class definition


A class that is generated from a template is sometimes called a templated class.

You can use class templates to modify existing classes. For example, you can define a class template that adds reference counting to an object as follows:

template <class T>

class TCount

{

int m_count;

T m_type;

public:

TCount( T type ) { m_type = type; m_count = 0; }

int IncrementCount() { return ++ m_count; }

int GetCount() { return m_count; }

T& GetContents() { return m_type; }

};


In this example, the template accepts one parameter, a type T. The generated class has one constructor, one method, and two assessor functions. This template would be useful for keeping count on an object. You could also use this template as a basis for creating smart pointers, which are pointers that track the references on them and automatically delete themselves when there are no more references.

The formal parameters in a template definition can be any legal C++ data type that is consistent with the template design. In addition to using built-in and user-defined data types, you can use other class templates as parameters in a template instantiation. For example, you can define a queue of counted strings as follows:

CQueue< TCount<CString> > m_Queue;


Note When using a template as a parameter, be sure to include a space between the closing brackets. For more information, see Function Template Syntax in this chapter.


  1. Instantiating Class Templates


Unlike function templates, class templates must be instantiated explicitly. To instantiate a class template, you provide the arguments for the template class. The following example code creates an instance of TCount that uses CString as the data type:

// Create an object called stringObject

TCount<CString> stringObject("test");

// Bump the count

stringObject.IncrementCount();


No code is generated for a class template until the template is instantiated by the creation of a variable. Moreover, member functions of the class are instantiated only if they are invoked by code somewhere in the application.


Using Collection Templates


Collections are useful for implementing the data structures that define your document classes in the application framework.

MFC collection classes provide member functions for managing the elements in collections. MFC includes templated and non-templated collection classes.

This section includes the following topics:


  1. Categories of Collections


MFC collection classes are organized into three main types, based on the data structures that are used. To see an illustration that shows these types, click this icon.


Arrays

An MFC array is a dynamically sized grouping of elements that are directly accessible through a zero-based integer subscript.

Lists

A list is an ordered grouping of elements. Use lists to implement queues and stacks.

You can add new elements at the beginning or end of a list, or before or after a specified element. You can traverse the list forward or backward.

Maps
A map is a dictionary or associative array that maps keys to values. Duplicate keys are not allowed.
Choosing a Collection Type for Your Application
The following table compares the characteristics of the three main collection types.

Characteristic List Array Map

Can the collection be ordered? Yes Yes No

Is the collection indexed? No By integer By key

Can elements be inserted quickly? Yes No Yes

Can elements be searched for quickly? No No Yes

Can the collection include duplicate elements? Yes Yes No (keys) Yes (values)

The three most commonly used collection classes are the templated collections CList, CArray, and CMap.

MFC Templated Collection Classes

MFC provides two groups of templated collection classes. One group, including CArray, CMap, and CList, is used to directly manipulate data structures. The others, CTypedPtrArray, CTypedPtrList, and CTypedPtrMap, are used to wrap other pointer classes to provide type safety and to minimize the amount of casting that is required.

CArray, CList, CMap

The MFC templated versions of the array, list, and map classes are CArray, CList, and CMap. These templates can hold a variety of objects. They can also hold pointers to objects. The template parameters determine the types of objects that the template can store. Because the CArray, CList, and CMap classes are derived from the CObject class, they inherit properties of CObject, such as serialization and dynamic creation.

With the templated versions of the collection classes, you can create specific instances suited to your data-storage requirements. To see sample code that shows the syntax for creating a collection based on a templated class, click this icon.


The following example code creates a collection based on CArray:

class myClass;
CArray <myClass, myClass&> myArray;
myArray.SetSize(5000, 1000);

Typed-Pointer Classes

The second group of templated classes in MFC allows type-safe wrapping of collections that contain pointers. The classes in this group are:

® CTypedPtrArray

Stores pointers in an array.

® CTypedPtrList

Stores pointers in a linked list.

® CTypedPtrMap

Maps keys to values. Both keys and values are pointers.

The typed-pointer array and list classes, CTypedPtrArray and CTypedPtrList, take two parameters: base_class and type. These classes can store any data type, which you specify in the type parameter. Each class is derived from a non-templated collection class that stores pointers. You specify this base class in base_class. For arrays, use either CObArray or CPtrArray. For lists, use either CObList or CPtrList.

The following example code creates a type-safe list, based on CObList, of CMyData objects:

CTypedPtrList<CObList, CMyData*> m_myList;

For more information about CObList, search for "CObList" in Visual C++ Help.

MFC Non-Templated Collection Classes

MFC versions prior to 3.0 had 17 non-templated collection classes. They have been superseded by the more encompassing templated collections, but are retained for reasons of backward compatibility and simplicity.

Type of collection Class name


Arrays CByteArray

CDWordArray

CObArray

CPtrArray

CStringArray

CWordArray

CUIntArray


Lists CObList

CPtrList

CStringList

Maps CMapPtrToWord

CMapPtrToPtr
CMapStringToOb
CMapStringToPtr
CMapStringToString
CMapWordToOb
CMapWordToPtr

For more information about any of these collection classes, search Visual C++ Help.

Debugging TemplatesThe easiest way to debug a template is to code and debug a specific class or function based on the template. Once you have tested the specific class or function, you can parameterize the targeted data and then continue to test the template design.

Template Libraries

Template Libraries
Visual C++ provides two libraries of templates: the Active Template Library (ATL) and the Standard Template Library (STL).

Template libraries such as ATL and STL differ from traditional C++ class libraries in that they are typically supplied only as source code (or as source code with a small supporting run-time library) and are not inherently hierarchical in structure. Rather than deriving from a class to get the functionality you want, you instantiate a class from a template.

Active Template Library

The Active Template Library is a set of templates with which you can easily create small, fast Component Object Model (COM) objects. ATL supports key COM features, including:

® Stock implementations of the interfaces IUnknown, IClassFactory, IClassFactory2, and IDispatch
® Dual interfaces
® Standard COM enumerator interfaces
® Connection points
® Tear-off interfaces
® ActiveX controls

You can use ATL code to create single-threaded objects, apartment-model objects, free-threaded model objects, or both free-threaded and apartment-model objects.

Standard Template Library

The Standard Template Library is a subset of the Standard C++ library. STL is a general-purpose library that contains template algorithms and container classes that work together to create application functionality. STL provides several of the most widely used containers, including lists, vectors, sets, and maps. The template algorithms include a number of essential data-manipulation tools for tasks such as searching, sorting, and merging.

STL provides libraries for the following functionality as shown in the table.

Use this STL library

To define this type of template

<algorithm> Numerous templates that implement useful algorithms


<deque> A class template that implements a deque container

<functional> Several templates that help construct predicates for the templates defined in <algorithm> and <numeric>

<iterator> Several templates that help define and manipulate iterators

<list> class template that implements a list container

<map> lass templates that implement associative containers

<memory> Several templates that allocate and free storage for various container classes

<numeric> Several templates that implement useful numeric functions

<queue> A class template that implements a queue container

<set> class template that implements an associative container with unique elements

<stack> class template that implements a stack container

<utility> everal templates of general utility

<vector> class template that implements a vector container


For more information about using STL, see the online documentation for the Standard C++ Library.

Creating Function Templates
A function template specifies a function that generalizes to arbitrary data types. This section discusses the details of function template definition as well as how to instantiate and override or "specialize" a function template.

This section includes the following topics:

Function Template Syntax

Function templates are composed of three elements:

® The template keyword
® A comma-delimited list of formal parameters, enclosed in angle brackets (<>)
® The function definition

A function that is generated from a template is sometimes called a templated function.

You can define function templates as extern, inline, or static, as you can any non-templated function.

The following example shows how you can code a function template for determining the lesser of two values:
// The template function works on numeric types.
template <class T>
T minimum (T& p1, T& p2)
{
return p1 <= p2 ? p1 : p2;
};

Angle Bracket Placement
Incorrect placement of angle brackets (<>) causes many template syntax errors. Make sure that you use proper spacing and parentheses to distinguish angle brackets from operators such as >> and –>. For example, the following code:

TempClass< float, a > b ? a : b > test1;

should be rewritten as:

TempClass< float, (a > b ? a : b) > test1;


Instantiating Function Templates
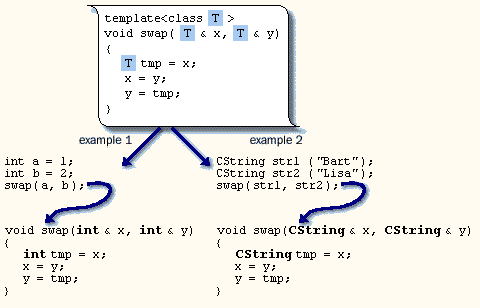
A function template specifies how to construct individual functions. This process of construction is called instantiation. A templated function is an instance of a function template.


To instantiate a function from a template, you supply data types as parameters to the function in your source code. The function is then instantiated when the code is compiled.

The compiler generates the code for each instantiation. Multiple declarations using the same data types will generate only one instance, but inline functions will generate multiple instances.

You use a templated function as you would any other function — that is, you can take the address of it as well as call it.

The following example code shows you how to define and use a function template:

template <class T>

T minimum (T& p1, T& p2)
{
return p1 <= p1 ? p1 : p2;
};
{
int a = 5, b = 10;
TRACE("the lesser of %d and %d is %d\n",
a,b,minimum(a, b));

double x = 5.9, y = 10.6;

TRACE("the lesser of %g and %g is %g\n",
x,y,minimum(x, y));
}

The compiler prevents the improper interaction of incompatible data types. If data types are incompatible, the compiler issues an error, as shown in the following example:

int x=2;
double d= 3.2;
swap(x,d); // Compiler Error:

Function templates are not limited to small functions. The following example code defines a template for the quicksort algorithm:

// Quicksort
// Function template that works on arbitrary data types.
// This function depends upon a swap function and
// a compare function, both which need to know
// how to operate on the targeted data type.
//
template <class Type>

void quicksort(Type* array, int loBound, int hiBound, int (*compfn)(Type,Type))
{
// stopping condition for recursion.
if (loBound >= hiBound)
return;

// the main algorithm.

int lo = loBound;
int hi = hiBound + 1; // increment now for a later pre-decrement.
Type elem = array[loBound];
for (;;)
{
// Compare elements here.
while ((lo<hiBound) && (compfn(array[++lo],elem)<0)) {}
while ((hi>loBound) && (compfn(array[--hi],elem)>0)) {}
if (lo < hi)
swap(array, lo, hi);
else
break;
}
swap(array, loBound, hi);
quicksort(array, loBound, hi-1, compfn);
quicksort(array, hi+1, hiBound, compfn);

}

Overriding Function Templates
You are not limited to using a function template as it is defined. You can define a unique behavior for a function by providing an explicit data-type specialization.

For example, consider a function template definition that compares two objects:
template<class T>
int compare(T a, T b)
{
return (a < b) ? -1 :(b < a) ? +1 : 0;
}

This template compares pointers but does not compare strings, so the template will not work as expected for char* data types. The solution for this case is to define a specialization of the compare function as follows:

int compare(char* a, char* b)
{
return stricmp(a,b);

Creating and Using Templates

Creating and Using Templates
This chapter explains what templates are and how you can use them to write more efficient and robust code.

Templates are mechanisms for generating functions and classes based on type parameters. You use templates to design a single class that operates on data of many types, instead of having to create a separate class for each type.

For example, you can use a function template to create a set of functions that apply the same algorithm to different data types; you can use a class template to develop a set of type-safe container classes.

This chapter shows you how to define and use class and function templates and how to use templated collection classes.

Objectives

After completing this chapter, you will be able to:

® Describe the advantages of using function and class templates.
® Describe the differences between function templates and class templates.
® Instantiate and override a function template.
® Instantiate a class template.
® Use a template to create a type-safe collection of objects.

Overview
A developer's programming model often consists of data and algorithms. In the C++ language, a template is a powerful mechanism that you can use to parameterize data. You can abstract data in function and class definitions. Templates are useful for classes and functions that generalize to arbitrary types, including built-in types such as integers and doubles, library-defined types such as the MFC type CString, and user-defined types.


This section includes the following topics:

Introduction to Templates
A template is an efficient language mechanism for providing groups of closely related classes and functions. Each class or function differs from other classes or functions in the group by the data types that are specified when the template is used. For example, when you use a class template that defines an array, you specify the data type that the array can contain.

A template definition resembles a function or class definition, except that a template definition is prepended with a template tag and a parameter list. You can parameterize built-in data types, such as char and double, as well as user-defined class types. You can specify multiple parameters; however, an empty parameter list is not valid.

A template is used when it is declared with a specific data type. The compiler creates a class or function from that template (as an intermediate step) and then instantiates the construct at the point where the code is used.

A template works in much the same way as a macro. However, unlike a macro, a template enables all the type-checking capabilities of the compiler. For example, the following macro defines the area of a square given the length of a side.

#define SquareArea(s) s*s

This will work for simple cases but it will fail with more complex cases, as in the following example code:

int side= 10;
int area;
area = SquareArea(side); // OK: area is 100
area = SquareArea(side+1); // Error: area is 21, should be 121

A template version of the same functionality looks like the following example code:

template< class T >
T SquareArea(T s)
{ return s*s; }


The template version works correctly on all cases:
side = 10;
area = SquareArea(side+1) // OK: 121


Benefits of Using Templates

Templates offer several benefits.

First, templates maximize reuse of source code and enforce strong type-checking. You can use a single template to handle any number of arbitrary data types. You can also handle arbitrary data types by converting to and from void pointers (void*), but this approach defeats the benefits of the C++ compiler's type-checking capability.

Templates also offer speed and size optimizations. When you use templates, the compiler instantiates only the code that is needed, so the code footprint is sharply reduced. The compiler can also embed template functions within other code; this optimization removes the cost of a function call, which can be significant for a tightly executing loop.


Types of Templates
There are two types of templates: function templates and class templates. When you work in C++, you will also use an important subset of class templates known as collection templates.


Function Templates

You use a function template to specify a set of functions that are based on the same source code but act on different data types. The compiled code for each function is generally different for each different data type, but the compiler will optimize where appropriate.

For example, the following illustration shows how you can define a function template for a family of swap functions that work with int and CString data types.


Class Templates

A class template provides a mechanism for abstracting user-defined data types as well as the associated member functions acting on that data. The following illustration shows a class template that uses two different data types — a string and a double.


Collection Templates

Collection templates are a subset of class templates. The methods of collection classes can be applied to any data type.

You can use collection templates to create data structures such as indexed arrays, linked lists, and associative arrays.

Instantiating Function or Class Templates

Template instantiation is a two-step process. The steps differ depending on whether you use a function template or class template.

Class templates are first instantiated to a class and then to an object.

When you instantiate a function template, first a specified data type is bound to the templated function, and then the function is compiled in the same manner that a standard function is compiled.